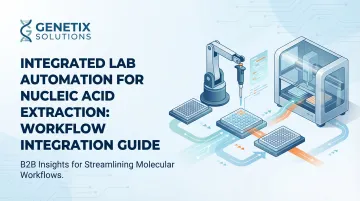
Introduction
Integrating an automated nucleic acid extraction (NAE) system into an existing lab workflow is moderately complex. It goes beyond physically placing an instrument: chemistry validation, instrument-to-LIMS data connectivity, downstream protocol compatibility, and regulatory documentation all need to be aligned before the system can go live.
A senior lab technician or lab manager with support from the instrument vendor can typically manage the process. External specialists are rarely required if the chosen platform is open-system and well-documented. That holds true, though, only when the integration process is followed correctly.
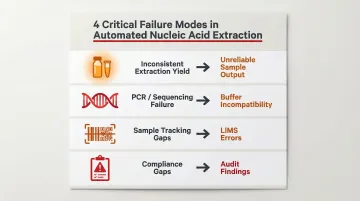
When labs rush or skip steps, common failure modes include:
- Inconsistent extraction yield across sample types
- Downstream PCR or sequencing failures from buffer incompatibility
- Sample tracking gaps in LIMS
- Compliance gaps that surface only during audits
The stakes are real. CAP Q-Probes data estimates patient identification errors in laboratory results at roughly 55 per 1,000,000 billable tests—a figure that extrapolates to over 160,000 adverse events annually in U.S. hospital-based laboratories alone, with similar patterns observed in high-volume labs globally.
This guide walks through the complete workflow integration process for automated nucleic acid extraction, covering lab readiness assessment through post-integration validation, so labs can deploy confidently and avoid the most common failure modes.
TL;DR
- Successful NAE integration requires aligning extraction chemistry, hardware configuration, and LIMS/LIS data connectivity from the start
- Before integrating, confirm sample compatibility, elution volume requirements, space/power readiness, and LIMS barcode format
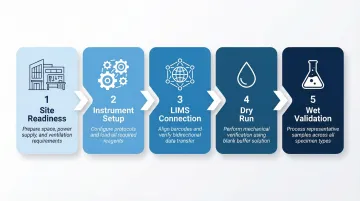
- Integration follows a defined sequence: site readiness → instrument setup → protocol programming → LIMS connection → dry run → wet validation
- Post-integration validation must cover yield, purity, and downstream assay performance, not extraction metrics alone
- Skipping validation is the leading cause of assay failures that surface weeks after go-live
Before You Integrate: Lab Readiness and Prerequisites
Assess Site and Infrastructure Readiness
Evaluate whether the available bench or hood space meets the instrument's physical footprint requirements. Compact automated extractors are specifically designed to fit inside a biosafety cabinet or laminar flow hood, which is a meaningful advantage for labs processing infectious samples or operating under containment requirements.
Confirm power supply specifications, ventilation adequacy, and whether a built-in UVC decontamination lamp is available or needs to be supplemented. For high-sensitivity nucleic acid work, contamination control at the instrument level directly affects result reliability. Research shows that UVC irradiation can achieve a 99.96% reduction in amplifiable genomic DNA targets on automated extractor decks.
Exposure must be strictly limited to empty decks: UVC completely inactivates Taq DNA polymerase and SYBR Green dyes, making post-cycle deck access a critical step to manage.
Map Sample Types and Chemistry Compatibility
Start by listing every sample type the lab currently processes:
- Whole blood
- FFPE tissue sections
- Nasopharyngeal swabs
- Saliva and buccal swabs
- Urine
- Cell-free DNA from plasma
Verify that the extraction chemistry—typically magnetic bead-based—has been validated for each type. Running a blood-optimized protocol on FFPE samples is a common and costly mistake.
FFPE tissues require extended Proteinase K lysis followed by thermal decrosslinking at 80°C to balance yield with nucleic acid integrity. Temperatures ≥90°C cause severe DNA fragmentation and should be avoided.
Identify elution volume and buffer requirements for each downstream application. NGS library prep typically requires higher-concentration, low-volume eluates in low-EDTA buffers, while qPCR workflows may tolerate broader parameters. Standard TE buffer contains 1.0 mM EDTA, which chelates Mg²⁺ ions essential for Taq polymerase, leading to delayed Ct values or complete amplification failure. Confirming elution conditions before go-live prevents a class of assay failures that are difficult to diagnose after the fact.
Confirm LIMS and Data Connectivity Readiness
Verify that the lab's LIMS or LIS can receive sample data from the extractor, including extraction metadata:
- Kit lot number
- Protocol used
- Run timestamp
- Output sample IDs in barcoded tube format
Establish whether this will require a middleware layer or can be done via direct API/file export. Modern LIMS integrations use HL7 v2 messaging, specifically OUL^R22 for specimen-oriented messages and OUL^R23 for container-oriented messages, allowing automated extractors to transmit detailed traceability data.
Check barcode symbology alignment — confirm the format used by the automated extractor's output tubes matches what the downstream LIMS scanner can read. Barcode format note: 2D Data Matrix barcodes outperform linear Code 128 on small microtubes — they pack more data into a smaller footprint and read reliably at just 25% contrast difference. Confirm 1D vs. 2D compatibility before assuming your existing scanner will work.
Do not proceed to installation or live use if:
- Sample-type-specific protocols have not been validated for the extraction chemistry
- Downstream instrument input requirements have not been confirmed in writing
- LIMS connectivity has not been tested end-to-end
Integrating Your Automated Nucleic Acid Extraction Workflow: Step-by-Step
Integration follows a defined sequence. Skipping steps — particularly running wet samples before a dry run — leads to failed validation runs, contaminated batches, and compliance flags that are far harder to resolve after the fact.
Step 1: Instrument Placement and Physical Setup
Before loading any reagents or samples, confirm:
- Instrument is positioned inside the hood or at the designated bench location
- Touchscreen interface is ergonomically accessible to the operator
- UVC lamp and power connections are functional
Proper physical segregation is mandated to prevent amplicon carryover. Workspaces must be organized to ensure a unidirectional workflow from clean areas (pre-PCR) to dirty areas (post-PCR). When handling infectious clinical specimens, primary specimen handling must be conducted within a certified Class II Biological Safety Cabinet.
Step 2: Protocol Configuration and Reagent Loading
Program extraction protocols for each sample type using the instrument's software interface. Instruments with pre-filled reagent cartridge systems simplify this step by eliminating manual reagent preparation and reducing pipetting variability. For example, Cambrian Bioworks' Manta uses a pre-filled cartridge approach with a touchscreen-guided setup that reduces setup mistakes caused by manual configuration.
Set and record all critical parameters:
- Lysis duration
- Bead incubation time
- Number and volume of wash steps
- Elution volume
Document these values as the validated protocol baseline — required for audit trails and change-control records.
Step 3: Sample Tracking and LIMS Connection
Configure the instrument to read input sample barcodes at the point of loading and to elute into pre-barcoded output tubes. Then run a test data transfer using simulated sample IDs to confirm that extraction records appear correctly, completely, and in the expected format.
Validate bidirectional data flow where required. Some clinical lab setups require the LIMS to push worklist instructions to the extractor, not just receive results from it — confirm this is configured and tested before live samples are processed.
Step 4: Dry Run (No Samples)
Run the system with water or blank buffer to verify all mechanical operations before introducing real samples. Check:
- Pipette volume accuracy
- Temperature control at lysis/elution steps
- Magnetic bead separation timing
- Wash step execution
Step 5: Wet Validation with Representative Samples
Process a representative set of real samples spanning all sample types used in the lab. Measure yield (ng/µL), DNA/RNA purity (A260/280 and A260/230 ratios), and run the extracted nucleic acid through the actual downstream assay:
- qPCR Ct values
- NGS fragment size distribution
- Other application-specific metrics
Confirm end-to-end performance meets the lab's acceptance criteria.
Post-Integration Validation and Quality Checks
Once the integrated system is live, validation isn't a one-time checkbox — it's a structured confirmation that each workflow component performs as expected, end to end.
Yield and Purity Benchmarks
Acceptable A260/280 values for high-quality gDNA typically fall between 1.8–2.0, while RNA values should be around 2.0. A260/230 below 1.8 signals potential carryover of organic contaminants or chaotropic salts that will inhibit downstream enzymes. Passing extraction metrics alone does not guarantee downstream performance.
That caveat matters most with degraded samples. Spectrophotometry overestimates usable DNA in highly fragmented FFPE or cfDNA samples, so fluorometric methods (Qubit) and fragment analysis (TapeStation DV200) more accurately predict sequencing success.
Conduct Downstream Assay Verification
Run extracted nucleic acid through the lab's actual clinical or research assay:
- For diagnostic labs: confirm Ct values fall within the validated range
- For NGS labs: confirm input DNA concentration and fragment size distribution meet library prep requirements
For FFPE RNA destined for NGS, the DV200 metric (percentage of RNA fragments >200 nucleotides) is a strong predictor of library preparation success, with DV200 >20% recommended as a minimum threshold.
Perform a Sample Tracking Audit
Trace 10–20 test samples from input through extraction to LIMS output. Confirm no sample IDs are missing, duplicated, or mismatched. Repeat this audit after any software update, LIMS reconfiguration, or protocol change.
Complete Regulatory and Quality Documentation
For IVD-grade deployments, document:
- Instrument qualification (IQ/OQ/PQ)
- Extraction performance validation data
- Operator training records
Align documentation with ISO 15189 requirements and applicable local regulatory standards such as ISO 13485. CE-IVD-marked instruments like Cambrian Bioworks' Manta include pre-validated extraction performance data, giving labs a documented starting baseline that reduces the volume of validation work required for regulatory sign-off.
Common Integration Challenges and How to Fix Them
Three categories account for the majority of integration failures in automated nucleic acid extraction workflows: biological protocol mismatches, downstream biochemical incompatibilities, and LIMS data errors. Each has a distinct root cause and a defined fix.
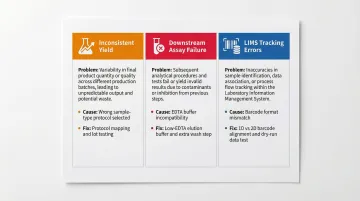
Inconsistent Extraction Yield Across Sample Types
Problem: A260/280 values vary significantly across runs, or certain sample types produce undetectable nucleic acid yield despite visible sample input.
Likely cause: A sample-type-specific protocol was not programmed. For example, using a whole blood protocol for FFPE tissue, which requires longer lysis and different bead ratios. Reagent lot variability can also contribute.
Fix:
- Map every sample type to its validated protocol configuration
- Audit lysis time and bead volume parameters for each sample type
- Introduce lot-to-lot acceptance testing for extraction kits before releasing new lots into clinical use
Downstream Assay Failure Despite Acceptable Extraction Metrics
Problem: Extracted DNA passes A260/280 and yield checks but causes inhibition or failure in qPCR, NGS, or other downstream assays.
Likely cause:
- Elution buffer incompatibility — EDTA in standard TE buffer chelates the Mg²⁺ ions required by Taq polymerase and other downstream enzymes
- Incomplete wash steps allowing carryover of chaotropic salts or ethanol
Fix:
- Switch to a low-EDTA (0.1 mM) or nuclease-free water elution buffer
- Add an additional wash cycle to the protocol
- Test for ethanol carryover using a spike-and-recovery experiment before resuming clinical processing
LIMS Data Gaps or Sample Tracking Errors
Problem: Extracted sample records do not appear in the LIMS, or barcodes are read inconsistently, causing samples to appear as "unregistered" in the tracking system.
Likely cause:
- Barcode format mismatch between the instrument's output tube labeling and the LIMS scanner configuration
- Incomplete LIMS integration setup that was not tested end-to-end before go-live
Fix:
- Align barcode format (1D vs. 2D) between the extractor's labeled output tubes and the LIMS scanner settings
- Run a 20-sample dry-run data transfer test and manually verify all records in the LIMS before processing real clinical samples
Pro Tips for a Seamless NAE Workflow Integration
- Validate all sample types in parallel during wet validation — running blood, swab, and FFPE samples simultaneously surfaces cross-type protocol conflicts before any sample type reaches clinical use, and cuts total validation time significantly.
- Use remote monitoring during extended runs to catch reagent depletion alerts or run failures without being on-site. This matters most for high-throughput setups processing multiple batches per shift.
- Document every protocol parameter, lot number, and validation result from day one — even in the testing phase. This record is the foundation for ISO 13485 compliance and reduces time spent responding to internal audits or regulatory inspections.
Conclusion
Integration quality directly determines the reliability of every downstream diagnostic and research result. Rushed or incomplete integration creates chronic, low-visibility yield variability — expensive and time-consuming to trace back to its root cause.
Completing prerequisites, validation, and LIMS connectivity correctly before deployment is what separates labs that struggle with batch failures from those that don't. Labs that get this right consistently report faster turnaround times, fewer failed runs, and lower cost per test. Platforms like Cambrian Bioworks' Manta and Beluga are designed with this integration reality in mind — compact, open-system instruments built to fit cleanly into existing clinical and research workflows without forcing infrastructure overhauls.
Frequently Asked Questions
What are the key steps involved in integrating an automated nucleic acid extraction system into an existing lab workflow?
Integration follows a five-stage sequence: site readiness assessment (space, power, ventilation), instrument setup and protocol configuration, LIMS connectivity setup, dry run verification, and wet validation with representative samples across all sample types used in the lab.
What sample types can be processed with automated nucleic acid extraction systems?
Modern magnetic bead-based automated extractors can process a broad range of sample types, including whole blood, FFPE tissue, nasopharyngeal swabs, saliva, urine, and cell-free DNA from plasma. Sample-type-specific protocols must be validated on the instrument before clinical use.
How do I ensure compatibility between my automated extraction system and downstream instruments like qPCR or NGS platforms?
Compatibility depends on elution buffer composition, elution volume, and nucleic acid concentration. Confirm these parameters meet the input specifications of the downstream instrument before integration, then run end-to-end validation with real samples across the full workflow.
What is the difference between an open-system and a closed-system automated nucleic acid extractor?
Open-system extractors accept reagent kits from multiple validated suppliers and offer greater protocol flexibility, while closed-system instruments are locked to proprietary reagents. Open systems are generally preferred when labs need to adapt workflows across multiple sample types or applications.
How long does automated nucleic acid extraction take compared to manual methods?
Automated extraction typically completes in approximately 30–55 minutes per run depending on sample type and protocol, compared to 1.5–3 hours for manual column-based methods, with consistent, hands-free operation throughout.
What validation documentation is required when integrating an automated NAE system in a clinical diagnostic lab?
Required documents include:
- Instrument qualification records (IQ/OQ/PQ)
- Extraction performance validation data (yield, purity, downstream assay performance)
- Operator training records and SOPs
All documentation must align with ISO 13485 or applicable local IVD regulatory requirements.